
Здесь буду выкладывать те куски кода по программированию для iOS на Objective-C, которые лично мне пригодились при реализации.
Как взять время без секунд из (NSDate *) date?
NSTimeInterval time = round([date timeIntervalSinceReferenceDate]/ 60.0) * 60.0;
NSDate *minute = [NSDate dateWithTimeIntervalSinceReferenceDate:time]self.navigationItem.hidesBackButton = YES;UIBarButtonItem *anotherButton = [[UIBarButtonItem alloc]
initWithTitle:@"Show"
style:UIBarButtonItemStylePlain
target:self
action:@selector(someToDoCode:)];
self.navigationItem.rightBarButtonItem = anotherButton;self.navigationItem.title = @"New title";Данные взяты с источника habrahabr.ru
Начиная с XCode версии 4.5 стали доступны литералы, призванные ускорить процесс разработки при помощи замены наиболее встречающихся длинных конструкций более короткими и удобными. Вот некоторые из них:
[NSArray arrayWithObjects:@"1", @"2", @"3", nil] => @[@"1", @"2", @"3"];[NSDictionary dictionaryWithObjects:@"1", @"2", @"3", nil forKeys:@"one", @"two", @"three", nil] => @{@"one" : @"1", @"two" : @"2", @"three" : @"3"}
[NSNumber numberWithChar:'A'] => NSNumber *theA = @'A';
//Целые
[NSNumber numberWithInt:42] =>  NSNumber *fortyTwo = @42;
[NSNumber numberWithUnsignedInt:42U] => NSNumber *fortyTwoUnsigned = @42U;
[NSNumber numberWithLong:42L] => NSNumber *fortyTwoLong = @42L;
[NSNumber numberWithLongLong:42LL] => NSNumber *fortyTwoLongLong = @42LL;
//С плавающей точкой
[NSNumber numberWithFloat:3.141592654F] => NSNumber *piFloat = @3.141592654F;
[NSNumber numberWithDouble:3.1415926535] => NSNumber *piDouble = @3.1415926535;
//Булевые
[NSNumber numberWithBool:YES] => NSNumber *yesNumber = @YES;
[NSNumber numberWithBool:NO] => NSNumber *noNumber = @NO;
UIView * customView = [[UIView alloc] initWithFrame:CGRectMake(0, 0, 100, 100)]; //вьюха размеры которой необходимо изменить
CGRect customFrame = customView.frame; //берем текущий фрейм
  customFrame.origin.x = 5; //изменение сдвига по X
  customFrame.origin.y = 10; //изменение сдвига по Y
  customFrame.size.width = 75; //изменение ширины
  customFrame.size.height = 175; //изменение высоты
  customView.frame = customFrame; //установка измененного фрейма нашей вьюхе
Данные взяты с источника habrahabr.ru
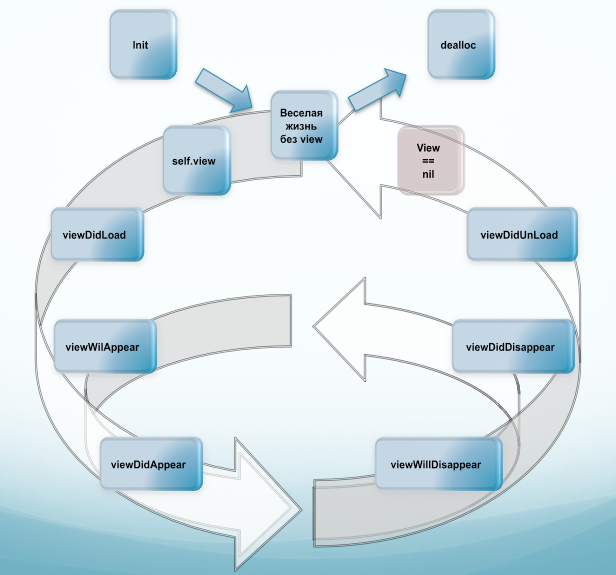
Методы жизненного цикла UIViewController'a и его UIView
Создание- init
- initWithNibName:
- (BOOL)isViewLoaded
- loadView
- viewDidLoad
- (UIView*) initWithFrame:(CGRect)frame
- (UIView*) initWithCoder:(NSCoder *)coder
- viewDidLoad
- viewWillAppear:(BOOL)animated
- viewDidAppear:(BOOL)animated
- viewWillDisappear:(BOOL)animated
- viewDidDisappear:(BOOL)animated
- viewDidUnload
- didReceiveMemoryWarning
- viewDidUnload
- dealloc
Создание PDF с помощью UIKit (на английском)
Как перевернуть изображение с камеры в правильную ориентацию с масштабированием?
Данные взяты с источника stackoverflow.com
- (UIImage *)scaleAndRotateImage:(UIImage *)image
{
  int kMaxResolution = 640; // Or whatever
  CGImageRef imgRef = image.CGImage;
  CGFloat width = CGImageGetWidth(imgRef);
  CGFloat height = CGImageGetHeight(imgRef);
  CGAffineTransform transform = CGAffineTransformIdentity;
  CGRect bounds = CGRectMake(0, 0, width, height);
  if (width > kMaxResolution || height > kMaxResolution)
  {
    CGFloat ratio = width/height;
    if (ratio > 1)
    {
      bounds.size.width = kMaxResolution;
      bounds.size.height = roundf(bounds.size.width / ratio);
    }
    else
    {
      bounds.size.height = kMaxResolution;
      bounds.size.width = roundf(bounds.size.height * ratio);
    }
  }
  CGFloat scaleRatio = bounds.size.width / width;
  CGSize imageSize = CGSizeMake(CGImageGetWidth(imgRef), CGImageGetHeight(imgRef));
  CGFloat boundHeight;
  UIImageOrientation orient = image.imageOrientation;
  switch(orient)
  {
    case UIImageOrientationUp: //EXIF = 1
      transform = CGAffineTransformIdentity;
      break;
    case UIImageOrientationUpMirrored: //EXIF = 2
      transform = CGAffineTransformMakeTranslation(imageSize.width, 0.0);
      transform = CGAffineTransformScale(transform, -1.0, 1.0);
      break;
    case UIImageOrientationDown: //EXIF = 3
      transform = CGAffineTransformMakeTranslation(imageSize.width, imageSize.height);
      transform = CGAffineTransformRotate(transform, M_PI);
      break;
    case UIImageOrientationDownMirrored: //EXIF = 4
      transform = CGAffineTransformMakeTranslation(0.0, imageSize.height);
      transform = CGAffineTransformScale(transform, 1.0, -1.0);
      break;
    case UIImageOrientationLeftMirrored: //EXIF = 5
      boundHeight = bounds.size.height;
      bounds.size.height = bounds.size.width;
      bounds.size.width = boundHeight;
      transform = CGAffineTransformMakeTranslation(imageSize.height, imageSize.width);
      transform = CGAffineTransformScale(transform, -1.0, 1.0);
      transform = CGAffineTransformRotate(transform, 3.0 * M_PI / 2.0);
      break;
    case UIImageOrientationLeft: //EXIF = 6
      boundHeight = bounds.size.height;
      bounds.size.height = bounds.size.width;
      bounds.size.width = boundHeight;
      transform = CGAffineTransformMakeTranslation(0.0, imageSize.width);
      transform = CGAffineTransformRotate(transform, 3.0 * M_PI / 2.0);
      break;
    case UIImageOrientationRightMirrored: //EXIF = 7
      boundHeight = bounds.size.height;
      bounds.size.height = bounds.size.width;
      bounds.size.width = boundHeight;
      transform = CGAffineTransformMakeScale(-1.0, 1.0);
      transform = CGAffineTransformRotate(transform, M_PI / 2.0);
      break;
    case UIImageOrientationRight: //EXIF = 8
      boundHeight = bounds.size.height;
      bounds.size.height = bounds.size.width;
      bounds.size.width = boundHeight;
      transform = CGAffineTransformMakeTranslation(imageSize.height, 0.0);
      transform = CGAffineTransformRotate(transform, M_PI / 2.0);
      break;
    default:
      [NSException raise:NSInternalInconsistencyException format:@"Invalid image orientation"];
  }
  UIGraphicsBeginImageContext(bounds.size);
  CGContextRef context = UIGraphicsGetCurrentContext();
  if (orient == UIImageOrientationRight || orient == UIImageOrientationLeft)
  {
    CGContextScaleCTM(context, -scaleRatio, scaleRatio);
    CGContextTranslateCTM(context, -height, 0);
  }
  else
  {
    CGContextScaleCTM(context, scaleRatio, -scaleRatio);
    CGContextTranslateCTM(context, 0, -height);
  }
  CGContextConcatCTM(context, transform);
  CGContextDrawImage(UIGraphicsGetCurrentContext(), CGRectMake(0, 0, width, height), imgRef);
  UIImage *imageCopy = UIGraphicsGetImageFromCurrentImageContext();
  UIGraphicsEndImageContext();
  return imageCopy;
}NSString * theFileName = [fullPath lastPathComponent];
Как показать клавиатуру программно для заданного UITextField * textField?
[textField becomeFirstResponder];[textField resignFirstResponder];Данные взяты с источника stackoverflow.com
NSData *jpegData = UIImageJPEGRepresentation(sourceImage, 0.75);
CGDataProviderRef dp = CGDataProviderCreateWithCFData((__bridge CFDataRef)jpegData);
CGImageRef cgImage = CGImageCreateWithJPEGDataProvider(dp, NULL, true, kCGRenderingIntentDefault);
[[UIImage imageWithCGImage:cgImage] drawInRect:drawRect];
Как использовать UISwipeGestureRecognizer?- (IBAction)showMessage:(id)sender{UIAlertView *message = [[UIAlertView alloc] initWithTitle:@"Alert Title"message:nildelegate:selfcancelButtonTitle:@"Cancel"otherButtonTitles:@"Ok", nil];[message setAlertViewStyle:UIAlertViewStylePlainTextInput];[message show];}- (void)alertView:(UIAlertView *)alertView clickedButtonAtIndex:(NSInteger)buttonIndex{NSString *title = [alertView buttonTitleAtIndex:buttonIndex];if([title isEqualToString:@"Ok"]){UITextField *value = [alertView textFieldAtIndex:0];NSLog(@"Text Field Value: %@", value.text);}}
Как правильно работать с JSON?- (void)setupLeftSwipeForViewUISwipeGestureRecognizer *swipeLeft =[[UISwipeGestureRecognizer alloc] initWithTarget:self action:@selector(handleSwipe:)];[swipeLeft setDirection:UISwipeGestureRecognizerDirectionLeft];[self.view addGestureRecognizer:swipeLeft];}- (void)handleSwipe:(UISwipeGestureRecognizer *)swipe{if (swipe.direction == UISwipeGestureRecognizerDirectionLeft){NSLog(@"Left swipe recognizer");}}
Basic JSON Parsing In IOS
Как отобразить один контроллер в Portrait или Down Upside Orientation, а остальные в Landscape Orientation?
Для решения необходимо добавить нижепредставленный метод в делегат приложения:
- (NSUInteger)application:(UIApplication *)application supportedInterfaceOrientationsForWindow:(UIWindow *)window
{
UIViewController *currentViewController = window.rootViewController;
if ([currentViewController isKindOfClass:[PortraitViewController class]])
{
return UIInterfaceOrientationMaskPortrait | UIInterfaceOrientationMaskPortraitUpsideDown;
}
else
{
return UIInterfaceOrientationMaskLandscape;
}
}Как наложить Blur эффект на изображение?
Adding Blur Effects on iOS
Как получить размер картинки без выгрузки ее в память?
stackoverflow source
#import <ImageIO/ImageIO.h>
- (CGSize)sizeOfImageAtURL:(NSURL *)imageURL
- (CGSize)sizeOfImageAtURL:(NSURL *)imageURL
{
CGImageSourceRef imageSource = CGImageSourceCreateWithURL((CFURLRef)imageURL, NULL);
if (imageSource == NULL)
{
// Error loading image
return CGSizeZero;
}
CGFloat width = 0.f, height = 0.f;CFDictionaryRef imageProperties = CGImageSourceCopyPropertiesAtIndex(imageSource, 0, NULL);
if (imageProperties != NULL)
{
CFNumberRef widthNum = CFDictionaryGetValue(imageProperties, kCGImagePropertyPixelWidth);
if (widthNum != NULL)
{
CFNumberGetValue(widthNum, kCFNumberCGFloatType, &width);
}
CFNumberRef heightNum = CFDictionaryGetValue(imageProperties, kCGImagePropertyPixelHeight);
if (heightNum != NULL)
{
CFNumberGetValue(heightNum, kCFNumberCGFloatType, &height);
}
CFRelease(imageProperties);
}
NSLog(@"Image dimensions: %.0f x %.0f px", width, height);
CGSize imageSize = CGSizeMake(width, height);
return imageSize;
RestKit HTTP базовая авторизация.
stackoverflow source
Using the objectmanager this would be something like:
NSURL* url = [[NSURL alloc]initWithString:@"http://rest.url.com"];
RKObjectManager* objectManager = [RKObjectManager managerWithBaseURL:url];

[objectManager.HTTPClient setAuthorizationHeaderWithUsername:@"username" password:@"password"];
Then, after setting the correct request/response you can use the objectmanager to do a get/post/etc:
[objectManager getObjectsAtPath:endpoint parameters:parameters success:
     ^(RKObjectRequestOperation *operation, RKMappingResult *mappingResult) {
         // do something
     }
     failure:^(RKObjectRequestOperation *operation, NSError *error) {
         // do something
     }
];
Как работать со сложной анимацией в IOS с помощью UIView Key-frame Animations
Introduction
The animation methods in
To show how to use
UIView has had animation methods since iOS2, adding the favored block-based API in iOS4. These methods are wrapper methods for the underlying CoreAnimation layers, upon which UIView instances are rendered.The animation methods in
UIView have allowed animation of animatable properties (such as transform, backgroundColor,frame, center etc) - by setting an end-state, duration and other options such as animation curve. However, setting intermediate states in the animation, so-called key-frames, has not been possible. In this case it was necessary to drop down to CoreAnimation itself and create a CAKeyFrameAnimation. This changes in iOS7 - with the addition of 2 methods to UIView, key-frame animations are now supported without dropping down to CoreAnimation.To show how to use
UIView key-frame animations we're going to create a couple of demos which use it. The first is an animation which changes the background color of a view through the colors of the rainbow, and the second demonstrates a full 360 degree rotation of a view, specifying the rotation direction.Продолжение будет...
Комментариев нет:
Отправить комментарий